There's a universally comforting magic in the aroma of sweet, spiced apples bubbling with a golden, tender topping. It's the kind of scent that instantly conjures images of cozy evenings, warm kitchens, and heartfelt gatherings. For many, this quintessential comfort comes in the form of an apple cobbler – a dessert that promises all the warmth and satisfaction of an apple pie, without any of the fuss. If you've ever felt intimidated by baking, or simply long for a show-stopping dessert that's genuinely easy to master, you've landed in the perfect spot.
Our beginner-friendly apple cobbler recipe isn't just easy; it's a revelation. We're talking about a quick, comforting dessert that has been meticulously perfected to ensure success every single time. Imagine sweet, tender apples, kissed with cinnamon and nutmeg, nestled under a cloud-like, buttery topping. This isn't just a recipe; it's an invitation to create a memory, a hug in dessert form that will have everyone asking for seconds. Get ready to impress yourself and your loved ones with this effortlessly delicious treat.
Why This Apple Cobbler Stands Above the Rest: The "One and Only" Recipe You Need
In the vast world of baking, finding that one "holy grail" recipe can be a journey. When it comes to apple cobbler, our team has embarked on an extensive quest, testing no less than nine different variations to arrive at what we confidently declare is the ultimate recipe. This isn't just a claim; it's a promise backed by countless hours of baking, tasting, and tweaking. We're so convinced, it’s the only The Only Apple Cobbler Recipe You Need: Easier Than Pie.
What makes this particular apple cobbler so special? It boils down to a few key factors that set it apart:
- Unmatched Comfort & Homey Feels: From the moment it bakes, filling your home with an intoxicating aroma, to that first spoonful of warm, gooey apple filling meeting a buttery, soft topping, this dessert delivers pure, unadulterated comfort. It's the culinary equivalent of curling up with a warm blanket on a chilly evening.
- Easier Than Pie: Let's face it, apple pie is a labor of love. While undeniably delicious, it demands precision, special tools, chilling times, and often, decorating skills. This apple cobbler, however, requires none of that. If you can slice apples and stir ingredients in a bowl, you can master this recipe. It’s the perfect entry point for beginner bakers looking for big flavor with minimal effort.
- Quicker Than Pie: Sometimes, dessert cravings strike, or you need a crowd-pleaser on short notice. This cobbler fits the bill perfectly. By giving the apple filling a quick pre-cook on the stove and crafting an easy, one-bowl batter for the topping, you significantly cut down on overall preparation and baking time compared to its pastry-laden cousin.
- Simple, Accessible Ingredients: You won't need to hunt down exotic components. This recipe champions basic pantry staples. In fact, you likely have most of what you need in your kitchen right now, making it a truly Pure Comfort: Homestyle Apple Cobbler Made with Simple Ingredients. It's also worth noting that this particular recipe is happily nut-free and egg-free, catering to more dietary needs without compromising on taste.
The Secret to Irresistible Flavor: A Closer Look at the Ingredients
A truly exceptional apple cobbler begins with thoughtful ingredient choices. While simple, each component plays a vital role in achieving that perfect balance of sweetness, spice, and texture. Here’s a breakdown of what you'll need and why:
The Apple Filling Stars:
- Apples: The obvious hero! We recommend a mix of tart and sweet varieties for the best flavor and texture. Granny Smith offers delightful tartness and holds its shape well, while Honeycrisp or Fuji bring sweetness and a softer bite. Peel them if you prefer a smoother texture, or leave the skins on for added rustic charm and fiber.
- Melted Butter: A touch in the filling adds richness and helps create that luscious, gooey sauce as the apples cook.
- Brown Sugar: This is crucial for the filling. Its molasses content not only sweetens but also adds a deep, caramel-like flavor that white sugar simply can't replicate. It contributes significantly to the "cozy spice" feeling.
- Lemon Juice: A squeeze of fresh lemon juice is a secret weapon. It brightens the apple flavor, preventing it from tasting overly sweet and offering a subtle tang that complements the spices beautifully. It also helps prevent the apples from browning too quickly.
- All-Purpose Flour: Just a small amount is whisked into the filling to help thicken the juices released by the apples, ensuring a perfectly spoonable, not watery, consistency.
- Spices (Cinnamon, Nutmeg, Allspice): This classic trifecta is a match made in heaven for apples. They infuse the filling with warmth and aromatic complexity, truly embodying those comforting fall flavors. Don't skimp on these!
The Fluffy Topping Essentials:
- White Granulated Sugar: Unlike the filling, white sugar is preferred for the topping. Our extensive testing revealed that brown sugar can weigh down the topping, preventing it from achieving that desired light and fluffy texture.
- All-Purpose Flour: Forms the structural base of the biscuit-like topping.
- Baking Powder: This leavening agent is essential for creating the lift and tender crumb that makes the topping so appealing. It's what gives it that beautiful rise in the oven.
- Salt: A pinch enhances all the other flavors, balancing the sweetness and making the spices pop.
- Buttermilk: For the softest, most tender, and utterly delicious topping, buttermilk is your best friend. Its slight acidity interacts with the baking powder, contributing to a wonderfully light texture. You can use low-fat or whole buttermilk. If you truly can't find it, whole milk can be a substitute, though the topping might be marginally less tender.
- Vanilla Extract: A splash of vanilla rounds out the flavors, adding a touch of sophisticated sweetness to the topping.
- Melted Butter: Integrated into the topping for unparalleled richness and a delicate, crisp edge.
Crafting Your Comfort: Step-by-Step for a Perfect Apple Cobbler
The beauty of this apple cobbler lies in its straightforward process. Even if you're a novice baker, you'll find these steps incredibly manageable, leading to a truly impressive result.
1. Prepare the Apple Filling: The Foundation of Flavor
- Slice Your Apples: Begin by peeling (optional, but preferred by many for dessert apples) and slicing your chosen apples into roughly ½-inch thick pieces. Aim for uniform slices to ensure even cooking. Place them directly into a large saucepan.
- Quick Pre-Cook on the Stove: This is a game-changer! Combine the sliced apples with melted butter, brown sugar, lemon juice, flour, cinnamon, nutmeg, and allspice in the saucepan. Cook over medium heat for just 5-7 minutes, stirring occasionally. This crucial step gives the apples a head start on softening, allowing them to release their delicious juices and begin to mingle with the spices and sugar. The result? A flavorful, gooey cinnamon-spice sauce that thickens beautifully in the oven, preventing a dry or watery filling. It also ensures the apples are perfectly tender when the cobbler is done baking.
- Transfer to Baking Dish: Once the apples are slightly softened and fragrant, pour the entire filling mixture into your prepared baking dish (a 9x13 inch dish or similar will work well). Spread it evenly.
2. Whisk Together the Easy Topping: One Bowl Wonder
- Combine Dry Ingredients: In a separate, medium-sized bowl, whisk together the white granulated sugar, all-purpose flour, baking powder, and salt. This ensures all the leavening and seasoning are evenly distributed.
- Add Wet Ingredients: Pour in the buttermilk, melted butter, and vanilla extract. Stir with a spoon or spatula until just combined. Be careful not to overmix; a few lumps are perfectly fine and actually help achieve a tender crumb. Overmixing can develop the gluten too much, leading to a tough topping.
- Spoon Over Apples: Gently dollop spoonfuls of the batter evenly over the pre-cooked apple filling. Don't worry about covering every single spot perfectly; the batter will spread as it bakes, creating that characteristic "cobbled" appearance.
3. Bake to Golden Perfection
- Preheat and Bake: Preheat your oven to the specified temperature (typically around 375°F/190°C). Place the baking dish on a rimmed baking sheet (to catch any potential drips) and bake for 30-40 minutes, or until the topping is golden brown and a toothpick inserted into the topping comes out clean. You'll know it's ready when the apple filling is visibly bubbling around the edges, and your kitchen smells absolutely divine.
- Cool Slightly and Serve: While tempting to dig in immediately, letting the cobbler cool for 10-15 minutes allows the filling to set slightly and prevents burned tongues.
Beyond the Basics: Tips for Elevating Your Cobbler Experience
While this recipe guarantees a phenomenal apple cobbler, a few extra tips can truly elevate your dessert game:
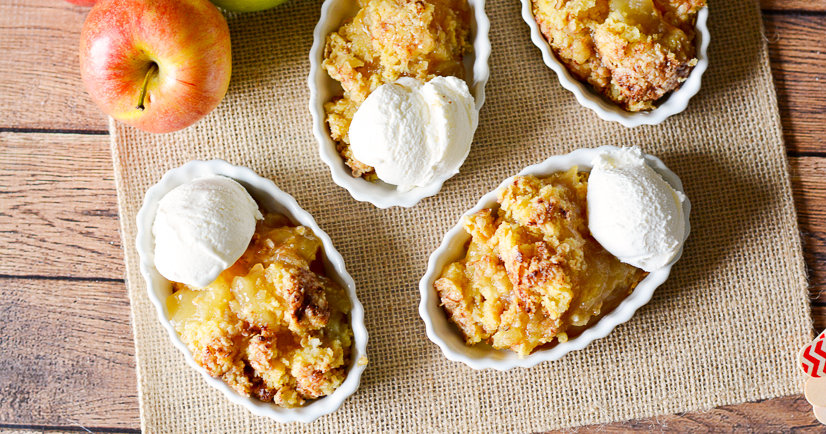
- Serving Suggestions: A warm slice of apple cobbler is divine on its own, but it truly shines with accompaniments. A scoop of good quality vanilla bean ice cream is classic, melting into the warm apples. A dollop of freshly whipped cream or a drizzle of caramel sauce also adds a luxurious touch.
- Don't Overbake: Keep an eye on your cobbler towards the end of baking. Overbaking can lead to a dry topping. The edges should be nicely golden, and the center puffed and cooked through.
- Storage: Leftover apple cobbler can be stored, covered, at room temperature for up to 1 day. For longer storage, refrigerate for up to 3-4 days. Reheat individual portions gently in the microwave or oven until warm through.
- Spice Variations: While the classic blend is perfect, feel free to experiment with a tiny pinch of ground cloves or ginger for a different twist. A tablespoon of bourbon or apple brandy added to the apple filling during the pre-cook can also add a sophisticated depth of flavor.
- Troubleshooting a Runny Filling: If your filling seems too watery, it could be due to a very juicy apple variety or insufficient pre-cooking. Next time, try adding an extra teaspoon of flour to the filling, or extend the stovetop pre-cook by a couple of minutes until the juices visibly thicken.
There you have it – the definitive guide to crafting a beginner-friendly apple cobbler that tastes like it came straight from a gourmet bakery, but was made with the loving simplicity of a homestyle kitchen. This recipe is more than just ingredients and steps; it's an experience waiting to unfold. From the first tantalizing aroma to the last comforting bite, this quick and easy comfort dessert is guaranteed to become a cherished favorite in your home. So go ahead, gather your ingredients, and prepare to bake some magic!
